Project Two: Your First Full Stack Application Blog, Website or Store.
Overview
This second project is your first foray into building a full-stack application. You'll be building a Node/Express/MongoDB app from the ground up yourself.
You will be working individually for this project;
You get to decide what you want to build - as long as it meets the technical requirements outlined below.
Once you've decided what you will build, please contact your instructional team for approval of your idea and then begin working on the Planning & Presentation Requirements below.
Planning & Presentation Requirements
- To receive a passing grade on this project, you need to have turned in the following:
-
A Trello board with:
- User Stories, each moving from left to right in the following three lists in your board:
- Ice Box
- Current/MVP
- Completed
User Stories must follow the following template: As a user, I want [feature], because [reason].
The reason is optional if it's blatantly obvious.
Note: Prioritize your user stories within the Ice Box with your "wish list" stories at the bottom.
- Wireframes of the main pages of functionality, e.g. Landing Page, Posts Index Page, Favorite Posts Page, Add Post Page, etc.
- An ERD showing the attributes of each model (or schema in the case of embedding) and the associations between them.
ERD
Here's a YouTube video to show you how.
Trello Board
Click here for an example you can use for inspiration
Finished Project Presentation
You will have a maximum of 7 minutes to present your project following these guidelines:
-
Introduce the Project:
☐ Intro your app by paraphrasing the README.
-
Demonstrate the Project:
☐ Launch the app by clicking the link in the README.
☐ Sign up a new user, then immediately log out.
☐ Log in with your preferred user and demonstrate the features of the app.
☐ Be sure to demo full-CRUD data operations.
-
Show/discuss your code:
☐ Show the "main" Mongoose model.
☐ Show your favorite JSX template.
☐ Show the controller for the main model.
-
Share the experience:
☐ What was your biggest challenge?
☐ What are your key learnings/takeaways?
- Q & A + Feedback
Technical Requirements
Your App Must:
☐ Have complete CRUD data operations
☐ Use a CSS stylesheet (Additional Use of a CSS Framework such as Bootstrap or Materialize is optional, however your must have your own stylesheet with some styles defined as well)
☐ Be deployed online (Heroku) - We will show you how to do this.
Optionally, Your App May:
☐ Consume a third-party API.
☐ Expose its own API where it returns data resources as JSON. (You will need to research how to do this ... hint res.json())
Necessary Deliverables
☐ A working full-stack app that meets or exceeds the above technical requirements, built by you, and hosted on Heroku.
☐ A README.md file with these sections:
☐ <Your app's title>: A description of your app. Background info of the app is a nice touch.
☐ Screenshot(s): Images of your actual app.
☐ Technologies Used: List of the technologies used, e.g., JavaScript, HTML, CSS...
☐ Getting Started: In this section include the link to your deployed app and any instructions you deem important.
☐ Next Steps: Planned future enhancements (icebox items).
Note: Don't underestimate the value of a well crafted
README.md. TheREADME.mdintroduces your project to prospective employers and forms their first impression of your work!
☐ Frequent commits dating back to the very beginning of the project. Commit messages should be in the present tense, e.g., "Style landing page" instead of "Styled landing page".
☐ Restful route table
Suggested Ways to Get Started
- Because your app's functionality revolves around the logged in user, implement authentication and basic navigation first!
- Discuss your app idea with an instructor to get their feedback before you dive too deep into user stories and wireframes.
- Remember to keep things small and focus on the MVP – feature creep can doom a project!
Project Idea Guidance
Nearly all of the applications you interact with on a daily basis would do for this project as most are "full-stack" CRUD apps.
Do Not Do Non-CRUD Applications Such As:
- Games
- Portfolio, or presentational pages
- Marketing or content oriented websites
Good Examples
Some of the best apps are solutions that track or manage things of personal interest to you:
- A BLOG
- Music lesson tracking
- Soccer team tracker
- Rock climbing planner
- An ETSY Store or Amazon like store clone
So much of the Internet is CRUD apps!
-
Social media:
-
Marketplaces:
- Craigslist
- Etsy
-
Organizational or Business apps:
- Customer management
- Payroll/Accounting
Many simple apps can have their functionality enhanced by implementing the ability of users to comment on, and/or like/favorite items.
Another piece of advice: If you choose to develop an app that has the concept of a shopping cart (storefront), do not attempt to implement the actual payment functionality.
Actual Recent Student Projects
Project Feedback + Evaluation
- Your instructors will be evaluating your project during your demonstration as well as reviewing the code in your repo.
- If your instructors determine that your project does not meet the above requirements (denoted using checkboxes), you and your instructional team will coordinate a resubmission deadline.
- If there is a specific section of code that you would like an instructor to provide feedback, please ask!
Useful Resources
- Writing Good User Stories (user story tips)
- Trello
- Example Trello Board
- How to Create ERDs
You can use Captain's Log and Fruits as your guide
OR.....
If you can't come up with your own Idea you will follow these prompts
Make a product inventory manager with full CRUD using Mongoose.
Learning Objectives
- Full CRUD app in Express with Mongoose
Prerequisites
- JavaScript
- JSX / Node
- Mongo / Mongoose

Expected Functionality (MVP)
| URL | HTTP Verb | Action | Notes |
|---|---|---|---|
| /products/ | GET | index | INDEX when a user types localhost:3000/products in browser this route shows a list or index of all products |
| /products/new | GET | new | NEW when a user types localhost:3000/products/new in browser this route shows the user a form to create a NEW fruit |
| /products/:id | DELETE | destroy | DELETE initiates a delete request through a form submission with action = http://localhost:3000/products/:idOfProduct and allows the application the ability to delete a product |
| /products/:id | PUT | update | UPDATE initiates a put request through a form submission with action = http://localhost:3000/products/:idOfProduct and allows the application the ability to Update data about a product |
| /products | POST | create | CREATE initiates a post request through a form submission with action = http://localhost:3000/products/ and allows the application the ability to Create a product |
| /products/:id/edit | GET | edit | EDIT when a user types localhost:3000/products/:idOfProduct/edit in browser shows the user a form to edit a product |
| /products/:id | GET | show | SHOW when a user types localhost:3000/products/:idOfProduct shows the user an Individual fruit in the browser |
Index Page
-
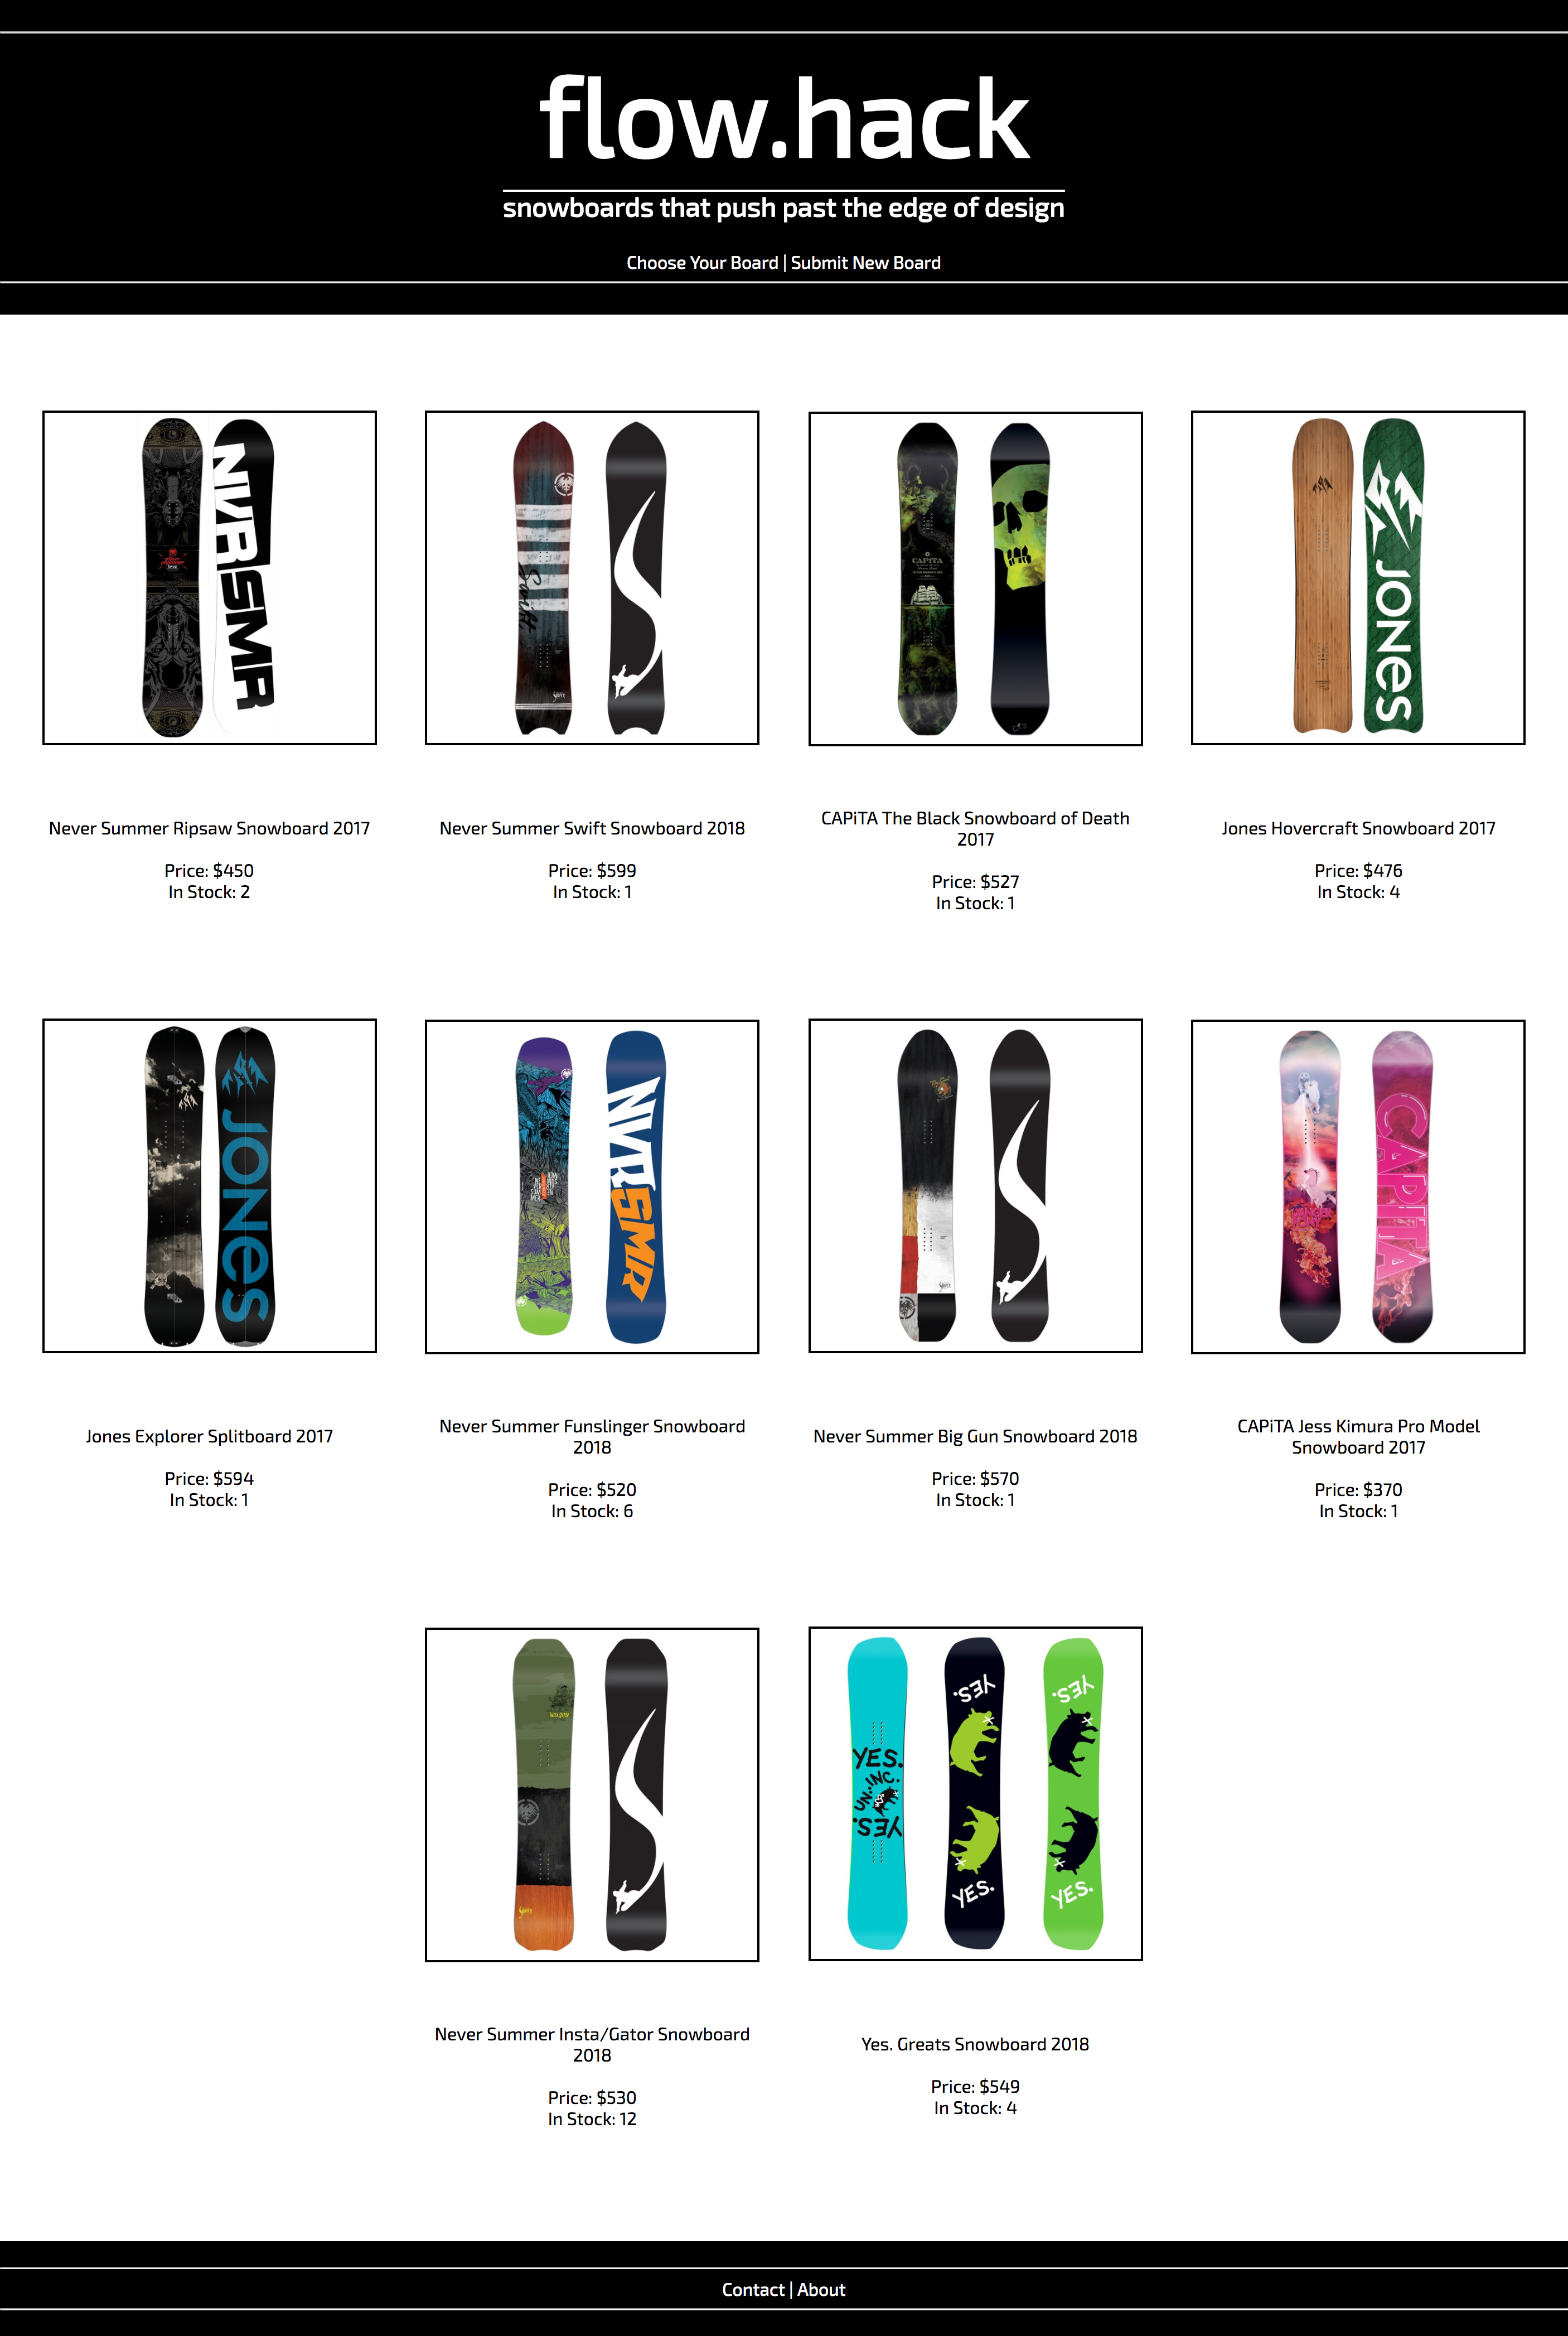
Your app should have an index page where
- all the products are displayed
- the images link to the product's show page
- and there should be a link to add a new product.
Example

Show Page
-
Your show page should display a product with
- a link back to the products
- a link to edit the product (goes to the edit page)
- a delete button that deletes
- and the number of items remaining in stock.
- There should be a BUY button. The BUY button will reduce the number of items in stock by 1 each time it's pressed.
Example

- If the quantity of your item is zero, the show page should say 'OUT OF STOCK' instead of saying how many are remaining. (Hint: conditionals in jsx).
- On the edit page, make sure you can set the quantity to zero if you want so that you can test if this is working.
- The BUY button should also not be rendered if the quantity of the item is zero.
Example

Edit & New Page
- These views should render forms and submit to the appropriate routes.
Redirects
- The create route should redirect to the index
- The delete route should redirect to the index
- The update route will redirect back to the product's show page.
- For the Hungry for more? the BUY button will go to a route that redirects back to the product's show page
Getting Started
- Inside the
mongoose_storefolder, set up Express with MVC architecture with the appropriate folders for models, views, and controllers. - You will need the seven RESTful routes. You can begin with your data-layer and test that everything works with cURL or Postman. Don't worry about what the BUY button does or where it goes just yet. Just set up your regular RESTful stuff.
-
You will need to make a Mongoose Schema in a products.js file for your products. The schema should have:
name: String, description: String, img: String, price: Number, qty: Number - Set up validations for the price and qty (can't be less than zero) and make the name a required field.
- Create a model and export it.
- Make sure you connect to your Mongodb atlas db
-
Make sure your controller can access your model:
const Product = require('./models/products'); - NOTE: For testing purposes, especially for having quick access to those wacky Mongo ids, maybe think about having a route /json that res.sends an index of all the data in json format so that you can copy/paste ids into your url bar or cURL or what-have-you.
The Buy Button
After you have your full CRUD app working, it's time to break/extend RESTful conventions according to your own lights. The app needs a buy button. It's up to you to make your own routes to facilitate it.
As mentioned in the expected functionality, if a product is in stock (the qty is above 0), the show page should have a BUY button. If the product is out of stock, it should not have this button.
When the BUY button is pressed, it will make a request to update the qty of the product (decrease it by 1). An example of how to increase something by 1 but you need to decrease it by one, research the answer in the docs/google
  Meme.findByIdAndUpdate(req.params.id, { $inc: {'like': 1 } }, {new: true }, (err, response) => {
   if (err) {
   //...some code
  } else {
   //...some other code
  })
Things to think about:
- What route should the BUY request go to? Maybe it could go to its own route.
- Since it updates the product, should it go to a PUT route?
- Do you need to send any data through to the route? You will need the id, but that is likely all you'll need.
- Can you edit the qty value just in the route? product.qty -= 1?
- Will you have to product.save() if you do this?
Seed Data
You can use these seeds to get some starting data if you so choose.
HANDY HINT: Make a route in your products controller /seed/newproducts (you can do that by pasting the code below into your controller), and to seed your database, just visit the route once in your browser.
app.get('/seed', async (req, res) => {
  const newProducts =
    [
      {
        name: 'Beans',
        description: 'A small pile of beans. Buy more beans for a big pile of beans.',
        img: 'https://cdn3.bigcommerce.com/s-a6pgxdjc7w/products/1075/images/967/416130__50605.1467418920.1280.1280.jpg?c=2',
        price: 5,
        qty: 99
      }, {
        name: 'Bones',
        description: 'It\'s just a bag of bones.',
        img: 'http://bluelips.com/prod_images_large/bones1.jpg',
        price: 25,
        qty: 0
      }, {
        name: 'Bins',
        description: 'A stack of colorful bins for your beans and bones.',
        img: 'http://www.clipartbest.com/cliparts/9cz/rMM/9czrMMBcE.jpeg',
        price: 7000,
        qty: 1
      }
    ]

  try {
    const seedItems = await Product.create(newProducts)
    res.send(seedItems)
  } catch (err) {
    res.send(err.message)
  }
})
Commits
The order in which you tackle this homework is up to you, but keep in mind that because this is a two-night homework, you haven't learned everything yet! Start with what you know and whenever you get to any of the following milestones, commit your work!
Milestones to Commit
Index - Commit your work
The commit message should read:
"Index working"
Show - Commit your work
The commit message should read:
"Show working"
Create route - Commit your work
The commit message should read:
"Create working"
Update - Commit your work
The commit message should read:
"Update working".
Delete - Commit your work
The commit message should read:
"Delete Working".
Buy - Commit your work
The commit message should read:
"Buy Button Working"
CSS - Commit your work
The commit message should read:
"App has style"
Style Inspiration
See some previous student's examples for some inspiration for your store. Great homework can make great portfolio pieces too!
Example 1

Example 2
Hungry for More of A Challenge?
2nd Model (Need to read docs, I haven't taught this.... Yet)
-
Make another model, this time for a User. The User will have:
username: String, shopping_cart: Array - On the product show page, when a user presses BUY, the product will be added to the User's shopping cart.
- View the shopping cart on the User's show page. (The User will need only a show page and none of the other routes).