Intro to Express: CRUD, MVC, REST, INDUCES and JSX
Move our presentation code into an JSX file
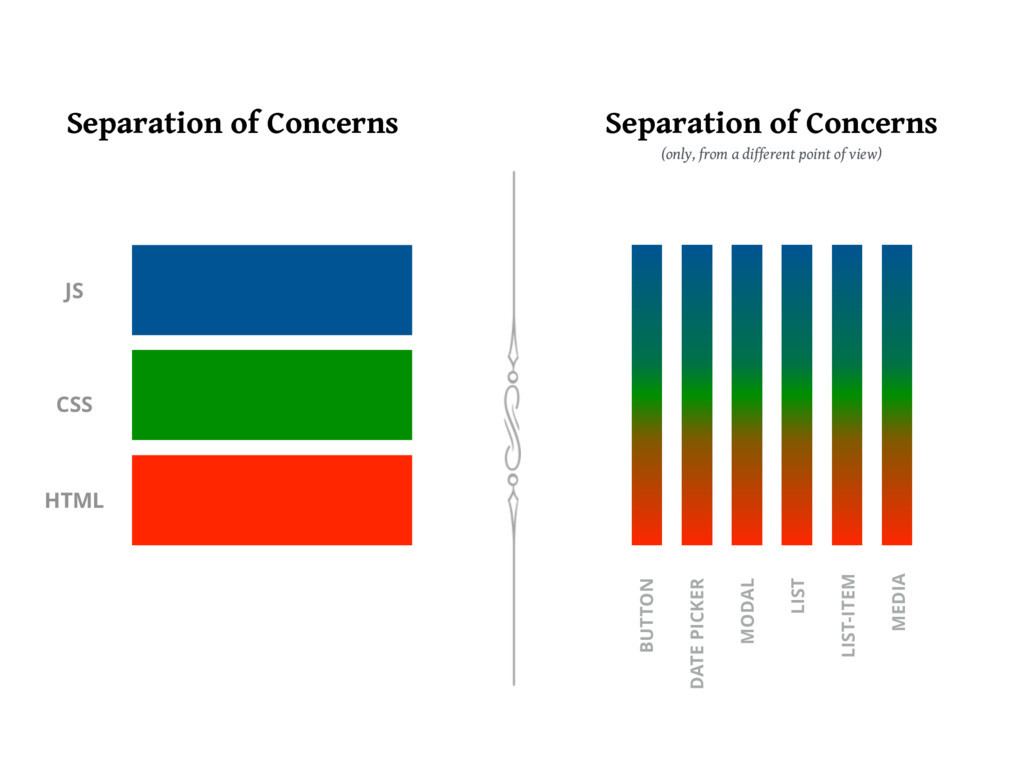
Templating with JSX and Component Driven Development
Explanation
CRUD, MVC, REST, INDUCES and JSX: Remember where we are going


What is JSX ?
A Syntax that allows us to write our HTML, CSS and Javascript in the same file so that we can more easily create user interfaces React is one of the most well known users of JSX. But other libraries like Lit-HTML, and KofuJS use it as well.
jsx-view-engine
This is an Express view engine which renders React components on a server. It uses react because it was made by facebook. It renders static markup and does not support mounting those views on the client.
This is intended to be used as a replacement for existing server-side view solutions, like jade, ejs (Like we have been using), or handlebars.
JSX USES
You can use JSX as a template language to tell your server how to dynamically change your HTML ( That's what we'll be doing for now)
You can also use JSX for very very sophisticated Dom Manipulation, and that's what we'll be doing in in 2 weeks after we have a good handle on servers.
Demonstration
A different way of Seperating Concerns ( Component Driven Development )
Lets Think of Games
- Job is to fight
- Job is to fish
- Job is to heal people
We could seperate 1 big group of fishers, 1 big group of fighters, 1 big group of healers Each group runs itself and are just dependent upon eachother to survive
OR
We could make a bunch of smaller self sufficient group with a few fishers, a few fighters, a few healers
Not saying either is better but each has it's advantages.
Now we want to move our View code (HTML) into a separate file just like we did with the data
-
Install the NPM package jsx-view-engine, react, react-dom (This will let us make our pages appear in the dom)
- this is a templating library that allows us to mix data into our html
- the HTML will change based on the data!
npm install jsx-view-engine react react-dom --save
-
Inside
/views/fruits, create a file calledShow.jsx(capitalized)- this will be the html for our show route
-
Put some html into
Show.jsxconst React = require('react') class Show extends React.Component { render () { return ( <h1> Show Page </h1> ); } } module.exports = Show; - Now we need to go to our
server.jsfile and set up our view engine and this must be done above our routes
  app.set('view engine', 'jsx');
app.engine('jsx', require('jsx-view-engine').createEngine());-
Now, instead of
res.send('some text'), we can callres.render('fruits/Show')- express will know to look inside the /views/fruits directory
-
it will send the html in the Show file as a response
app.get('/fruits/:indexOfFruitsArray', (req, res) => {
    res.render('fruits/Show');
});
Now lets mix our data into our HTML
-
Our route is acting like the controller now. Let's gather the data and pass it to the view
app.get('/fruits/:indexOfFruitsArray', (req, res) => { res.render('fruits/Show', { //second param must be an object fruit: fruits[req.params.indexOfFruitsArray] //there will be a variable available inside the jsx file called props.fruit, its value is fruits[req.params.indexOfFruitsArray] }); }); -
Access the data in the view:
const React = require('react') class Show extends React.Component { render () { const fruit = this.props.fruit return ( <div> <h1> Show Page </h1> The {fruit.name} is {fruit.color} {fruit.readyToEat? 'Its is ready to eat' : 'It is not ready to eat... Cant touch this' } </div> ); } } module.exports = Show; - Note that we place javascript inside of curly braces as soon as you put curly braces React knows you want to execute js
❓ Essential Review Questions
- Where do we get Fruit From?
- What two lines of code make our application able to use the JSX View Engine
Map A Developers best friend
- Lets update the Index route
-
Now, instead of
res.send('some text'), we can callres.render('fruits/Show')- express will know to look inside the /views/fruits directory
-
it will send the html in the Index file as a response
app.get('/fruits', (req, res) => {
    res.render('fruits/Index', { fruits: fruits });
});
- Lets write our Index.jsx
    const React = require('react');

    class Index extends React.Component {
      render() {
          const { fruits } = this.props;
          return (
                  <div>
                      <h1>Fruits Index Page</h1>
                      <ul>
                          {fruits.map((fruit, i) => {
                              return (
                                  <li>
                                      The{' '}
                                      <a href={`/fruits/${i}`}>
                                          {fruit.name}
                                      </a>{' '}
                                      is {fruit.color} <br></br>
                                      {fruit.readyToEat
                                          ? `It is ready to eat`
                                          : `It is not ready to eat`}
                                      <br />
                                  </li>
                              );
                          })}
                      </ul>
                  </div>
          );
      }
    }
    module.exports = Index;
❓ Essential Review Questions
- What is JSX?
- What does Map Do.
For Your Reference

Create a cloud-based MongoDB database with Atlas
While developing an application that requires a MongoDB, you can only connect to your local MongoDB engine for so long. This is because the application, once deployed, will have to connect to a MongoDB engine accessible via the Internet. So we are going to use MongoDB Atlas from the beginning so that your application data always persists in the Cloud.
It makes sense to set up and connect to a hosted MongoDB sooner, rather than later. Doing this will ensure that any data, users, etc., created will be there upon deployment.
In addition, it's advantageous to use a service to host MongoDB databases so that you can create databases anytime you want.
The most popular service for hosting MongoDB databases, not surprisingly, is MongoDB's own Atlas.
ALSO NOTE: YOU WILL ONLY DO THIS ONCE !!!!! DON'T CREATE MULTIPLE CLUSTERS
Unless you just got whole lot of money
Create an Atlas Account
First you will need to signup for a free account here:

Create a New Cluster
Once logged in, Atlas will request that you create a cluster. (click on build a New cluster, if you don't see create)
Atlas allows one free cluster per account.
A cluster can contain multiple MongoDB databases - which Atlas refers to as namespaces.
Be sure to select the Cloud Provider & Region nearest to you that shows a FREE TIER AVAILABLE:

Next, in the Cluster Tier section, select the M0 Sandbox tier:

Finally, you can optionally change the name of the cluster, then click the Create Cluster button:

It may take several minutes for Atlas to build your cluster.
Add a User for the Cluster
Each cluster must have a user created whose credentials will be provided in the database connection string when connecting to a database.
First click the Security tab:

Click the + ADD NEW USER button, then enter a username, password, select the Read and write to any database option, then click the Add User button also note password should be letters and number only no special characters no spaces no underscores:

Update the Whitelisted IPs
Atlas has a security feature that allows the databases to be accessed by whitelisted (approved) IP addresses only.
However, you must whitelist all IPs to ease development and deployment of your application, once you are ready to deploy you will restrict it to only your ip and the ip of your deployed server (It's not time to do that yet though)
While still in the Security tab, click IP Whitelist, then click the + ADD IP ADDRESS button.
In the dialog, first click ALLOW ACCESS FROM ANYWHERE then click the Confirm button:

Obtain the Connection String
To obtain the connection string for your .env file, first click the CONNECT button:

Select the Connect Your Application option:

Next, ensure that the Node.js driver and latest version is selected. Then click the Copy button to add the connection string to your clipboard:

Use the Connection String in Your App
- In the terminal in vs code
touch .env .gitignore - then
npm i dotenv - then in
.gitignoreadd the following code
node_modules
.env
You can now paste the connection string in the app's .env file, assigning it to a MONGO_URI environment variable:
MONGO_URI=mongodb+srv://sei:<THISISTHEPASSWORD___REMOVE___THE___CARATS>@sei-w0kys.azure.mongodb.net/<THISISTHEDATABASENAME___REMOVE___THE___CARATS>?retryWrites=trueYou're almost done, but you need to update the connection string as follows:
- Replace
<password>with the password of the database user you created earlier. - IMPORTANT The connection string by default connects to a namespace (database) named
test(...mongodb.net/test?retryWrites=true...). However, thetestnamespace must be updated to your preferred namespace (database) name. For example, "movies" (...mongodb.net/movies?retryWrites=true...).
You're good to go!
Add .env to server.js and refactor code
require('dotenv').config()
const express = require('express')
const fruits = require('./models/fruits')

const app = express()

app.use(express.urlencoded({ extended: true}))
app.set('view engine', 'jsx');
app.engine('jsx', require('jsx-view-engine').createEngine());


// Index
app.get('/fruits', (req, res) => {
    res.render('fruits/Index', { fruits: fruits });
});

// New

// Delete

// Update

// Create

// Edit

// Show
app.get('/fruits/:indexOfFruitsArray', (req, res) => {
    res.render('fruits/Show', { //second param must be an object
        fruit: fruits[req.params.indexOfFruitsArray] //there will be a variable available inside the jsx file called props.fruit, its value is fruits[req.params.indexOfFruitsArray]
    });
});

app.listen(PORT, () => {
  console.log(`${PORT} is lit`)
})
Viewing & Editing Data
FYI, you can use the Atlas app to view and edit data by clicking on the COLLECTIONS button.
Connections, Schema, Models, Document and Collections
- The Connection connects your Node.js Server to MongoDB
- Schema ensures the structure of your data that you put into the database
- Models is the class that implements the schema and gives us javascript methods we can use to interact with MongoDb Database, it automatically makes a Collection in the DB, comprised of Documents that pass the Schema.
- Document is an Instance of the Model and is represented by one Object In a collection
- Collection is a group of documents of the same Model
Where Does It Fit in With MVC
| URL | HTTP Verb | Action | Used For | Mongoose Method | View |
|---|---|---|---|---|---|
| /fruits/ | GET | index | Displaying a list of all fruits | Fruit.find | Index.jsx |
| /fruits/new | GET | new | Display HTML form for creating a new fruit | none | New.jsx |
| /fruits/:id | DELETE | destroy | Delete a specific photo | Fruit.findByIdAndRemove or Fruit.findByIdAndDelete | none |
| /fruits/:id | PATCH/PUT | update | Update a specific fruit | Fruit.findByIdAndUpdate or Fruit.findOneAndUpdate | none |
| /fruits | POST | create | Create a new fruit | Fruit.create | none |
| /fruits/:id/edit | GET | edit | Return an HTML form for editing a fruit | Fruit.findOne or Fruit.findById | Edit.jsx |
| /fruits/:id | GET | show | Display a specific fruit | Fruit.findOne or Fruit.findById | Show.jsx |
Note: Only GET Requests render a View In RESTful Routing
Understanding Structure
| Connections | Schema | Models | Document | Collection | Database | Cluster |
|---|---|---|---|---|---|---|
| In server.js, or connection file Connect to DB using Connection URL | In model file identify the structure of your data | Use the schema to create a new Model that can connect to DB with JavaScript methods like .find, create and .findOneAndUpdate |
An instance of the Model that passes the schema, residing in a collection | The group of documents that were added to the database by a specific Model | A collection of all your collections, every app should have it's own Database | All your databases in your Atlas Account live in your cluster, you only need one cluster and all your databases go in the cluster |
For people that know SQL
- Collection ====> Table
- Document ====> Row
- Key on Schema =====> Column
Connect Express to Mongo with Mongoose
npm i mongoose- Inside server.js:
Here's the latest options to include to get rid of the deprecation warnings:
const mongoose = require('mongoose');

//... and then farther down the file
mongoose.connect(process.env.MONGO_URI, { useNewUrlParser: true, useUnifiedTopology: true });
mongoose.connection.once('open', ()=> {
    console.log('connected to mongo');
});
Create Fruits Model
mkdir modelstouch models/fruit.js- Create the fruit schema
const mongoose = require('mongoose');

const fruitSchema = new mongoose.Schema({
    name:  { type: String, required: true },
    color:  { type: String, required: true },
    readyToEat: Boolean
});

const Fruit = mongoose.model('Fruit', fruitSchema);

module.exports = Fruit;
Have Create Route Create data in MongoDB
Inside server.js:
const Fruit = require('./models/fruit.js');
//... and then farther down the file
app.post('/fruits', (req, res)=>{
    if(req.body.readyToEat === 'on'){ //if checked, req.body.readyToEat is set to 'on'
        req.body.readyToEat = true;
    } else { //if not checked, req.body.readyToEat is undefined
        req.body.readyToEat = false;
    }
    Fruit.create(req.body, (error, createdFruit)=>{
        res.send(createdFruit);
    });
});
Create a new route and page
- Let's create a page that will allow us to create a new fruit
-
First, we'll need a route for displaying the page in our server.js file IMPORTANT: put this above your show route, so that the show route doesn't accidentally pick up a /fruits/new request
//put this above your Show route app.get('/fruits/new', (req, res) => { res.render('fruits/New'); }); -
Now lets's create the html for this page in our /views/New.jsx file
const React = require('react'); class New extends React.Component { render() { return <div>New Page</div>; } } module.exports = New; - Visit http://localhost:3000/fruits/new to see if it works
Add interactivity to your site with forms
We can use forms to allow the user to enter their own data:
   const React = require('react');

   class New extends React.Component {
     render() {
       return (
           <div>
               <h1>New Fruit page</h1>
               {/* NOTE: action will be the route, method will be the HTTP verb */}
               <form action="/fruits" method="POST">
                 Name: <input type="text" name="name" /><br/>
                 Color: <input type="text" name="color" /><br/>
                 Is Ready To Eat: <input type="checkbox" name="readyToEat" /><br/>
                 <input type="submit" name="" value="Create Fruit"/>
               </form>
           </div>);
       }
     }

   module.exports = New;
NOTE: the form element has an action and a method attribute. We get these values from our RESTful routes table. We'll need this info for the next step too.
Review and Refactor Index Route
Edit views/fruits/Index.jsx
Have Index Route Render All Fruits
app.get('/fruits', (req, res)=>{
    Fruit.find({}, (error, allFruits)=>{
        res.render('fruits/Index', {
            fruits: allFruits
        });
    });
});
Update the jsx file:
const React = require('react');

class Index extends React.Component {
  render() {
    return (
        <div>
            <h1>Fruits index page</h1>
            <ul>
                {
                   this.props.fruits.map((fruit, i) => {
                    return (
                        <li>
                        The { fruit.name } is { fruit.color }
                        { fruit.readyToEat ? `It is ready to eat` : `It is not ready to eat` }
                        </li>
                        )
                    })
                }
            </ul>
        </div> );
  }
}

module.exports = Index;
Add a link to the new page:
<nav>
    <a href="/fruits/new">Create a New Fruit</a>
</nav>
Have Create Route redirect to Index After Fruit Creation
Inside the create route
Fruit.create(req.body, (error, createdFruit)=>{
    res.redirect('/fruits');//sends to /fruits get route
});
Have Index Page Link to Show Route
{
   this.props.fruits.map((fruit, i) => {
    return (
        <li>
        The <a href={`/fruits/${ fruit.id }`}> { fruit.name } </a> is { fruit.color }
        { fruit.readyToEat ? `It is ready to eat` : `It is not ready to eat` }
        </li>
        )
    })
}
Update Show.jsx
Edit the views/fruits/Show.jsx file- Change JSX
const React = require('react');

class Show extends React.Component {
    render(){
        return (
            <div>
                <h1>Fruits show page</h1>
                The { this.props.fruit.name } is { this.props.fruit.color }
        { this.props.fruit.readyToEat ? `It is ready to eat` : `It is not ready to eat` }
            </div>
        )
    }
}
module.exports = Show;
Render the jsx
app.get('/fruits/:id', (req, res)=>{
    Fruit.findById(req.params.id, (err, foundFruit)=>{
        res.render('fruits/Show', {
            fruit:foundFruit
        });
    });
});
Test that you can do the following
- Go to
http://localhost:3000/fruits/new - Create a new
fruit - See the fruit at
http://localhost:3000/fruits - Show page for fruit works
- You can see fruit in your MongoDB Atlas DB fruits database
Review Questions
❓ In your own words, describe the use case for Mongoose (what is it's purpose and when might you choose to use it?).
❓ A Mongoose _ is used to make a Mongoose Model.
❓ We use a Mongoose _ to perform CRUD operations on a MongoDB..
require('dotenv').config()
const express = require('express')
const mongoose = require('mongoose')
const fruits = require('./models/fruits')

const app = express()

app.use(express.urlencoded({ extended: true}))
app.set('view engine', 'jsx');
app.engine('jsx', require('jsx-view-engine').createEngine());
mongoose.connect(process.env.MONGO_URI, { useNewUrlParser: true, useUnifiedTopology: true });
mongoose.connection.once('open', ()=> {
    console.log('connected to mongo');
});

// Index
app.get('/fruits', (req, res)=>{
    Fruit.find({}, (error, allFruits)=>{
        res.render('fruits/Index', {
            fruits: allFruits
        });
    });
});

// New
app.get('/fruits/new', (req, res) => {
    res.render('fruits/New');
});

// Delete

// Update

// Create
app.post('/fruits', (req, res)=>{
    if(req.body.readyToEat === 'on'){ //if checked, req.body.readyToEat is set to 'on'
        req.body.readyToEat = true;
    } else { //if not checked, req.body.readyToEat is undefined
        req.body.readyToEat = false;
    }
    Fruit.create(req.body, (error, createdFruit)=>{
      res.redirect('/fruits');//sends to /fruits get route which renders index page
    })
  })

// Edit

// Show
app.get('/fruits/:id', (req, res)=>{
    Fruit.findById(req.params.id, (err, foundFruit)=>{
        res.render('fruits/Show', {
            fruit:foundFruit
        });
    });
});

app.listen(PORT, () => {
  console.log(`${PORT} is lit`)
})